
CorelDraw
 Tips and Examples
- Customize your Toolbars.
- Customize the Property Toolbar.
- Property Toolbar Commands.
- Snap to Objects.
- Formulas in the Property and Transformation Toolbars.
- Selecting Objects.
- Drawing Scale.
- Nudging Objects, Nodes and Control Points
- Changing the Size of a Selection.
- Find the center of a circle with 3 Points.
- Isometric Left or Right View.
- Isometric Bottom View.
- Undo/Redo Tip.
1. CUSTOMIZE YOUR TOOLBARS

Add new command buttons: Select \Tools\Customization![]() , select Commands, and drag and drop the command button to a toolbar.
, select Commands, and drag and drop the command button to a toolbar.
Move a command button from one toolbar to another: Hold the [Alt] key pressed while you drag the command button to another toolbar.
Copy a command button: Hold the [Alt] and [Ctrl] keys pressed while you drag the command button.
<Admin: 20-Jun-2008>
2. CUSTOMIZE THE PROPERTY TOOLBAR.

To copy the [Angle of Rotation] button
![]() from the Transformation Toolbar to the Property Toolbar
when it is in "text mode" : Select any text to activate the "text mode" of the Property Toolbar,
hold the [Alt] and [Ctrl] keys pressed while you drag the command button to the
Property Toolbar. Now you can rotate text at a desired angle.
from the Transformation Toolbar to the Property Toolbar
when it is in "text mode" : Select any text to activate the "text mode" of the Property Toolbar,
hold the [Alt] and [Ctrl] keys pressed while you drag the command button to the
Property Toolbar. Now you can rotate text at a desired angle.
<Admin: 20-Jun-2008>
3. COMMANDS OF THE PROPERTY TOOLBAR
- Snap to Objects
![]() : You can
snap to Node, Intersection, Midpoint, Quadrant, Tangent, Perpendicular, Edge,
Center and Text Base Line.
: You can
snap to Node, Intersection, Midpoint, Quadrant, Tangent, Perpendicular, Edge,
Center and Text Base Line.
- Dynamic Guides
![]() : By default
you have guides at 0, 45, 90 and 135º.
: By default
you have guides at 0, 45, 90 and 135º.
- Treat as Filled
![]() : If this button is pressed, you can select a shape by
clicking inside the fill. If the button is depressed nothing is selected when
you click over a fill.
: If this button is pressed, you can select a shape by
clicking inside the fill. If the button is depressed nothing is selected when
you click over a fill.
Note : you can add the [Snap Setup]
![]() and the [Dynamic Guides Setup]
and the [Dynamic Guides Setup]
![]() buttons from
\Tools\Customization\Commands, select View from the list and drag the
buttons to the desired toolbar.
buttons from
\Tools\Customization\Commands, select View from the list and drag the
buttons to the desired toolbar.

<Admin: 06-Set-2007>
4. SNAP TO OBJECTS
First you have to activate the [Snap to Objects] button
![]() . You can
snap to Node, Intersection, Midpoint, Quadrant, Tangent, Perpendicular, Edge,
Center and Text Base Line:
. You can
snap to Node, Intersection, Midpoint, Quadrant, Tangent, Perpendicular, Edge,
Center and Text Base Line:

Example: Drag a Rectangle from it's right Midpoint to the circle's left quadrant :

<Admin: 30-Set-2007>
5. FORMULAS IN THE PROPERTY AND TRANSFORMATION TOOLBARS
You can use formulas containing +, -, *, /, ^ to change the Position, Size or Angle of Rotation of a shape.

<Admin: 20-Jun-2008>
6. SELECTING OBJECTS
Default Selection: Select all objects inside the selection box.
 |
|
| Selection Box | 2 Objects Selected |
Selection + ALT key: Select all objects inside the selection box and all objects that intersect the selection box.
 |
|
| Selection Box | 4 Objects Selected |
Selection + ALT key: Select a shape that is hidden below another objects.
 |
|
| Nothing Selected | 1 Object Selected |
Selection + SHIFT key: add an object to the actual selection. The
Shift key can be used in combination with the Alt key.
 |
|
| 4 Objects Selected | 5 Objects Selected |
Selection + CTRL key: Select an item of a group of objects.
 |
|
| 1 Group Selected | 1 Object Selected |
<Admin: 02-Apr-2010>
7. DRAWING SCALE
To change the drawing scale of CorelDRAW: \View\Grid and Ruler Setup
![]() , select
Rulers from the list and click on [Edit Scale].
, select
Rulers from the list and click on [Edit Scale].

Note: You can also invoke the scale double clicking the Ruler.
Note : The scale is saved with each document.
<Admin: 06-Set-2007>
8. NUDGING OBJECTS, NODES AND CONTROL POINTS
You can move objects, nodes and control points, the distance
configured as nudge Offset
![]()
Select the objects and press the arrow keys:

Select a node range and press the arrow keys:
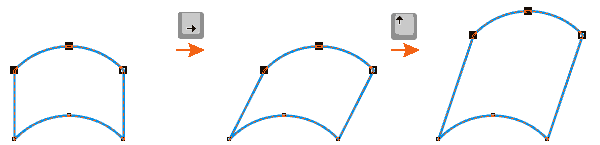
Select a control point and press the arrow keys:

<Admin: 02-Apr-2010>
9. CHANGING THE SIZE OF A SELECTION
The problem : You have many shapes on a document and they have a wrong size, but you know that one of them must measure 25 units, but actually it measures 10. You want to scale all the shapes to the right size.
The Solution : Select all the shapes again and edit the width (<actual width> / 10 * 25) and press [Enter], you divide between 10 to get the unity, and you multiply by 25 because it's the desired measure.
Verification : Select again the shape that measured 10, now it measures 25 !

<Admin: 06-Set-2007>
10. FIND THE CENTER OF A CIRCLE WITH 3 POINTS
Draw a line between the 1st and 2nd point and another line between the 2nd and 3rd point.
Duplicate (press the "+" key) the 1st line and rotate 90º (enter "90" in the Transformation Toolbar), do the same with the 2nd line.
Extend both lines till they intersect, the intersection is the center of the circle.
Finally select the ellipse tool and hold pressed the [Ctrl] and [Alt] keys, click on the intersection and drag till the circle touch the 3 points.
Note: Verify the circle touches the 3 Points, CorelDraw isn't very accurate drawing circles.

<Admin: 20-Jun-2008>
11. ISOMETRIC LEFT OR RIGHT VIEW.
Draw a rectangle around the selection (necessary only if it's an irregular shape)
Define the axis (the bottom left corner or the bottom right corner of the rectangle), you can mark it with a cross.
Draw a circle with center on the axis (hold pressed the [Alt] and [Ctrl] keys), and drag till the circle touches the opposite bottom corner of the rectangle.
Draw a Line (with the isometric angle, example: 30º) from the axis to an external point of the circle.
Drag a "Vertical Guide Line" till it touches the intersection between the circle and the 30º line.
Now you can stretch the rectangle till it touches the "vertical guide line", and skew to the desired angle (in this example 30º).

<Admin: 20-Jun-2008>
12. ISOMETRIC BOTTOM VIEW
Draw a rectangle around the selection (necessary only if it's an irregular shape)
Define the axis (the bottom left corner or the bottom right corner of the rectangle), you can mark it with a cross.
Draw a circle with center on the axis (keep pressed the [Alt] and [Ctrl] keys), and drag till the circle touches the opposite top corner of the rectangle.
Draw a Line (with the isometric angle, example: 30º) from the axis to an external point of the circle.
Drag an "Horizontal Guide Line" till it touches the intersection between the circle and the 30º line.
Now you can stretch the rectangle till it touches the "horizontal guide line", and skew to the desired angle (in this example 30º).

<Admin: 20-Jun-2008>
13. UNDO/REDO TIP
The Problem : You deleted or modified an object some steps back and now you want to recover it, but you also don't want to loose the new changes that you have recently done !!!.
The Solution :
- Press [Undo] until the deleted object appears.
- Select and [Copy] the object you want to retrieve. (only select and copy, don't do any change)
- Press [Redo] to recover all changes.
- Press [Paste] to recover the deleted shape.

<Admin: 20-Jun-2008>